How Previews Work
- The Preview build process: explained
- The Build snapshot
- How Base Previews work
- Base Preview Auto Select
- Preview size: explained
- Preview status
The build process: explained
When you kick off a Preview build, Tugboat grabs the config file from your linked repository. Tugboat follows the instructions to set up each Service in your config file, grabbing the specified Docker images and then executing the Service Commands in three phases:
initupdatebuild
During the init phase, you might use commands that set up the basic preview infrastructure. This might include things
like installing required packages or tools, or overriding default configuration files.
During the update phase, you might use commands that import data or other assets into a service. This might include
things like importing a database, or syncing image files into a service.
During the build phase, you might use commands that build or generate the actual site. This might include things like
compiling Sass files, updating 3rd party libraries, or running database updates that the current code in the preview
depends on.
In the process of building your Preview, you’ll specify a default service, and that’s the service where your git repository is cloned. If you want to clone it into other services, see: cloning git repositories into your Services.
By the time the build is complete, Tugboat has configured Services according to your config file, including pulling the Docker images you want it to use for each Service, and has pulled in your code to execute your Preview.
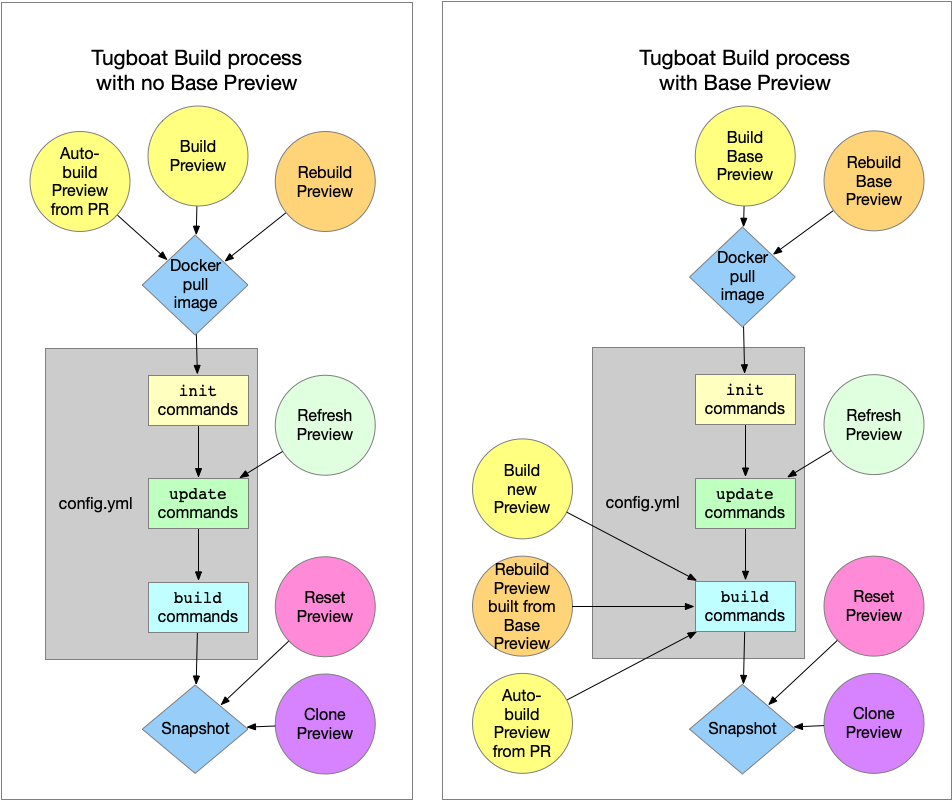
Why build phases matter
When you’re changing or
updating your Preview builds - or
building new Previews from a Base Preview - the build process
may bypass some of the build phases. For example, when you Refresh a Preview, the build process pulls in updated code
from your repo, but only executes Service commands from update and build - bypassing the init commands.
This can get a little complicated, so we’ve made a handy-dandy flowchart to help you keep track of where various processes start in each build phase:
The Build Snapshot
After your Tugboat Build completes, Tugboat commits the entire container, taking a snapshot of that container, including all of its data and Services, at that moment in time.
When you do things like:
Tugboat uses that build snapshot as the basis for those actions, enabling you to quickly duplicate a Preview build or reset a Preview build to the state it was in the moment the build completed.
When Tugboat creates the build snapshot, the containers are fully stopped while the snapshot is taken, and then restarted again once the data is committed. If you try to implement a script that “sleeps” in the background while the Preview is being built, that process will not be present when the Preview restarts.
How Base Previews work
When you build a regular Preview, the configuration file typically instructs Tugboat to pull in databases, image files, or other assets. This process can take a while; the larger the assets, the longer the build.
When you mark a Preview as a Base Preview, Tugboat uses that Preview’s build snapshot as a starting point for every new Preview build that matches that Base Preview type. None of the new Previews need to re-download copies of databases, image files, or other assets. Base Previews can dramatically reduce the amount of time required to generate a working Preview.
In addition to speeding up your Preview builds, Tugboat saves disk space by storing only a binary difference between the Base Preview and Previews built from that Base Preview. A new Preview only uses whatever space it needs that differs from the Base Preview. Often, this means a Base Preview might use 2-3GB of space, and a Preview built from it might only use 100-200MB. This is a great way to keep a Tugboat Project under your billing tier’s storage limit, even when you’re building multiple Previews.
When you set a Base Preview, new Previews that match that Base Preview type - including Previews that
are built automatically from pull requests - use the Base Preview as a starting point, and build only from the build
stage. This means that if you’re making changes that would be processed during init or update stages, or changing a
Docker image, you’ll need to either
rebuild the Base Preview, or
build the Preview from scratch without the Base Preview.
Base Preview Auto Select
Tugboat automatically selects the appropriate Base Preview for your new Preview Builds. When you’re using Base Previews, and you build a new Preview, Tugboat automatically starts that Preview build from all Base Preview types that match it. New Preview builds can match against these Base Preview types:
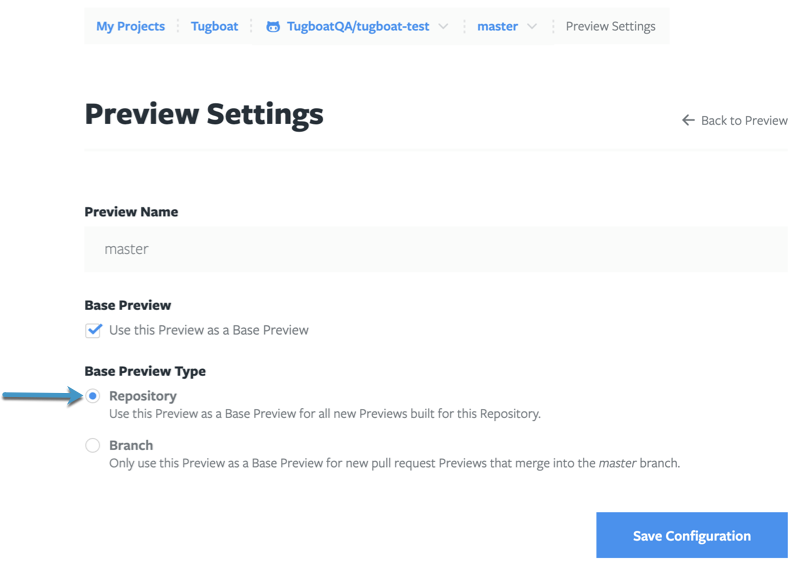
Repository Base Preview
When you set a Base Preview as a Repository Base Preview, you’re telling Tugboat to build every new Preview within this repository from this Base Preview.
You can still manually build a Preview without a Base Preview; see: manually Build a Preview with no Base Preview.
You can set multiple Repository Base Previews. When you do that, a new pull request generates a Preview build from every Repository Base Preview. If you have two Repository Base Previews, and you make a pull request with new code, Tugboat kicks off two new Preview builds - one from each Repository Base Preview.
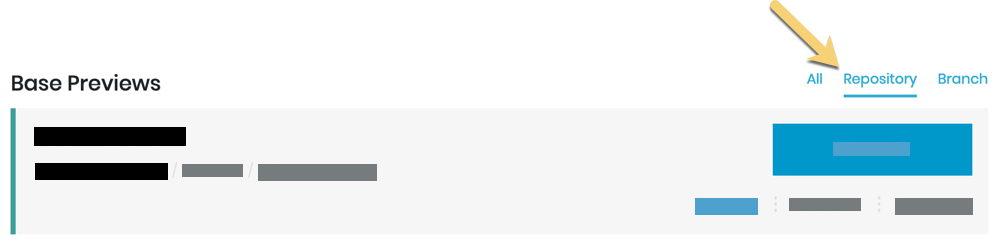
You can narrow your view to see only the Repository Base Previews by selecting the Repository view filter.
The default Preview Type for all Base Previews is Repository Base Preview.
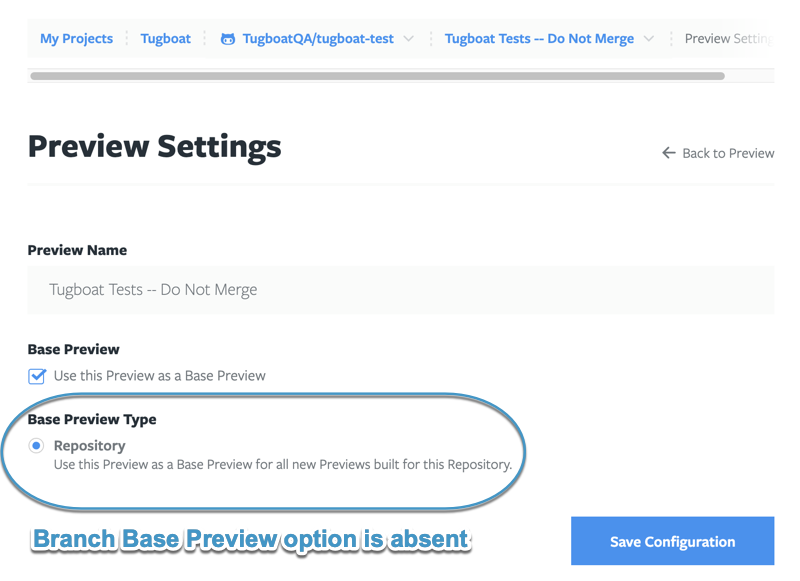
When you set a pull request Preview build as a Base Preview, you’ll only see the option to make it a Repository Base Preview. You won’t see the option to designate it a Branch Base Preview because it’s not a Branch in the linked git repository.
If you want to work with multiple integration branches, we recommend you first manually build a branch-based Preview for each of the integration branches you will be working with. Configuring each to be a branch-based Preview will then allow your pull-request-based Previews that are branched off from those integration branches to automatically use the correct base Preview.
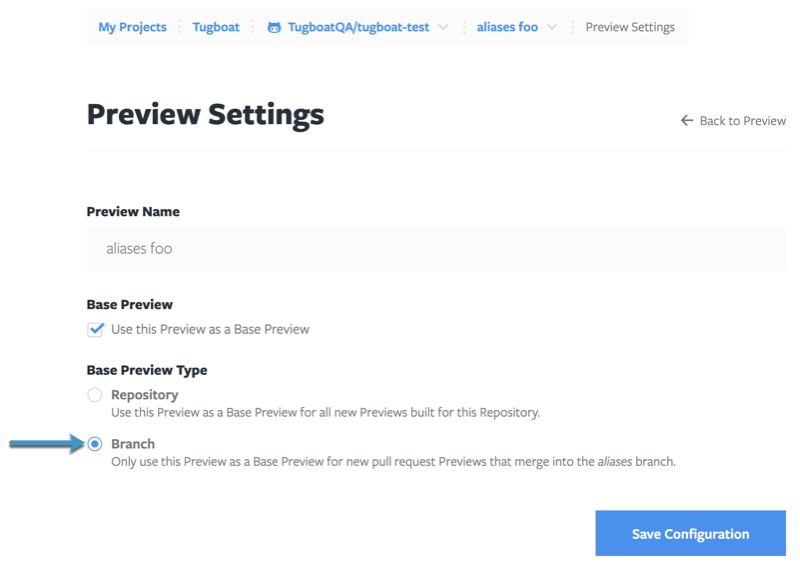
Branch Base Preview
When you set a Base Preview as a Branch Base Preview, you’re telling Tugboat to use this Base Preview as the starting point for every Preview built from a pull request that merges into this Branch.
If you have set both a Branch Base Preview and a Repository Base Preview, Tugboat generates builds from both of these Base Previews, because both Base Preview types would match new Preview builds.
A Branch Base Preview gives you flexibility to have Tugboat automatically select the appropriate starting Base Preview for different configurations. For example, you could set Branch Base Previews for different versions of a framework; for example, Drupal 8.7 and Drupal 9.0. When a pull request is merged into one of these branches; i.e. a contributor request to merge a pull request into the Drupal 8.7 branch, the Tugboat Preview uses the Drupal 8.7 Branch Base Preview as the starting point for that Preview build.
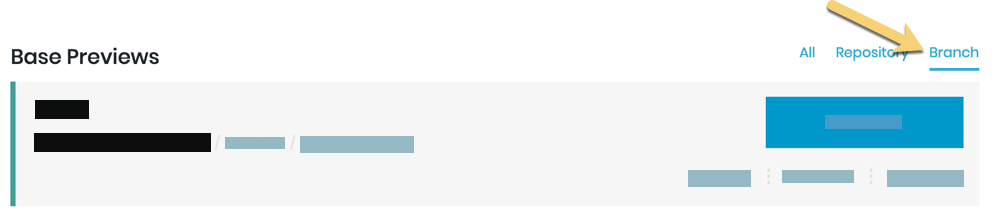
You can narrow your view to see only the Branch Base Previews by selecting the Branch view filter.
Preview size: explained
What Tugboat calls “Preview size” is actually the size of the container in which the Preview lives. When a Preview is done building, Tugboat takes a snapshot of the container at that moment in time, and that’s what you’re seeing in your Tugboat Dashboard.
When you set up Services in your Preview, Tugboat pulls those Service images into the Preview container. Each of these Service images contributes to the total size of the Preview when it is fully built.
For example, say I’m building a Preview that uses Tugboat’s Service images for apache, mysql and redis; those
Service images are 154MB, 226MB, and 147MB at the time of this writing. That’s over 500MB for these Services; by the
time you add a database file, the container’s operating system and other assets, you’ll likely be looking at 800MB to
1GB for a Preview that’s only pulling in 100KB of code from your linked git repo.
This is why working from a Base Preview is so helpful in reducing Preview size; all of those assets are contained in the Base Preview. When you build a new Preview from the Base Preview, the new Preview only contains what’s different in the PR, Branch or Tag you’re building. In my example above, a new Preview built from the Base Preview was only 20KB.
Preview status
Preview status is indicated in a couple of different ways:
Color
- Green: Preview has built successfully and is ready to view.
- Yellow: A Preview action is in progress.
- Red: Preview build has failed, or has been stopped.
Status message
- Ready (and active): When your Preview finishes building successfully, you’ll see a
green
readystatus, with a green dot to indicate that the Preview is active and ready to view. When you click the link, you’ll go directly to your site Preview. - Ready (and inactive): After your Preview has built and some time has passed, you’ll see
a green
readystatus, with a green half-moon to indicate that the Preview is available, but is currently suspended. When you go to the Preview link, you’ll see a splash page while the Preview starts running again, and then you’ll be taken to your Preview. If you don’t want to wait through the splash page, you can go to the Actions drop-down next to the Preview button, and select Start; this will restart the Preview. When the half-moon switches to a green dot, you’ll be able to go directly to the Preview, bypassing the splash screen. - Building: While your Preview build is in-progress, you’ll see a
buildingstatus in yellow. If your Preview build is taking significantly longer than your average build time, displayed in the Repository Stats section lower on the Project -> Repo page, you may want to start troubleshooting. - Rebuilding: When a rebuild has been kicked off, you’ll see a
rebuildingstatus in yellow. This indicates a complete Preview rebuild from the beginning of the build process, so it should take as long as a typical build. - Refreshing: When a refresh has been kicked off, you’ll see a
refreshingstatus in yellow. This indicates a Preview that is pulling in the latest code from git, and then running any commands in theupdatesection, followed by thebuildsection of the Configuration file. - Resuming: When you’ve used the Action -> Start option, you’ll see a
resumingstatus in yellow while the Preview starts spinning up services again. - Stopping: When you’ve used the Action -> Stop option, you’ll see a
stoppingstatus in yellow while the Preview goes through the process of stopping services. - Stopped: When you’ve used the Action -> Stop option, you’ll see a
stoppedstatus in red to indicate that the Preview has successfully stopped services. - Suspended - When Previews have been inactive for a period of time, you’ll see a
suspendedstatus. Any incoming HTTP request to the preview will automatically start it again. - Failed: When something goes wrong during the last action that was taken on the Preview,
you’ll see a
failedstatus in red. Details should be available in the Preview’s activity logs. Sometimes a failed Preview can be recovered by resetting it. For more help with afailedpreview, take a look at our troubleshooting docs, or go to our Help and Support page to join our Slack support channel or email us. - Unavailable - When something goes wrong trying to load the Preview, you may see an
unavailablestatus. This usually indicates an internal Tugboat error. Resetting a Preview often fixes this. - Canceled - When you cancel a Preview while it’s building, you’ll see a
canceledstatus in red.
Service states
A Service could be in any of the above states, as well as:
- Committing - Tugboat is taking a snapshot of the current state of the Service.
- Waiting - Tugboat is performing some operation on the Service’s repo, and the Service is waiting for its turn.